Import Demographics
The Import Demographics feature allows for the quick importing of multiple student accounts via an Excel file. Alternatively, if the student data you're importing is not already in an Excel format, or resides in another software system, the Student Application API can be used to import multiple students programmatically.
Note: Importing only supports creating new accounts and cannot update existing students.
Instructions
If this is your first time using the Import Demographics feature, we recommend testing the process in your 'zNightly Training' environment first.
- Prepare the Excel file
- Northstar requires the column names to strictly match their internal field names. Please review and rename the columns in your file to ensure they match the expected internal names exactly.

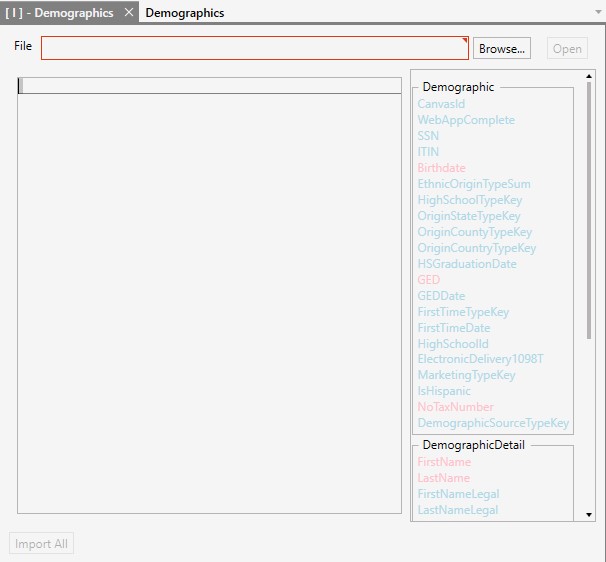
- A full list of all of the supported field names can be seen below, in the 'Demographic' and 'DemographicDetail' group boxes on the side of the Import Demographics form (Fig. 2.1).
- The fields in red are required and every row in the file must have a value for that column, eg. 'FirstName', 'LastName' and 'Birthdate'
- The fields in blue are optional.
- Although the list of internal names does not denote the data type, Northstar does support automatic conversion and value matching to make the process simpler.
- Example 1: The 'IsHispanic' field maps to a boolean (true/false) data type. In Excel, you can enter either "1" and "0" or "True" and "False".
- Example 2: The 'HighSchoolTypeKey' field, like other fields with "Key" in their name, maps to an integer data type, representing the internal link to the corresponding High School Type record. For most "Key" fields, the importer will accept either the PK value (obtained from the left-most column of the High School Types form), or the display value as shown on the Demographics form, eg. "Alta High School"
- Access the "Import Demographics" form
- Open the Demographics form.
- In Navigation, it's located under the 'Student Management' header.
- Click the "Import" button located in the bottom right-hand corner.
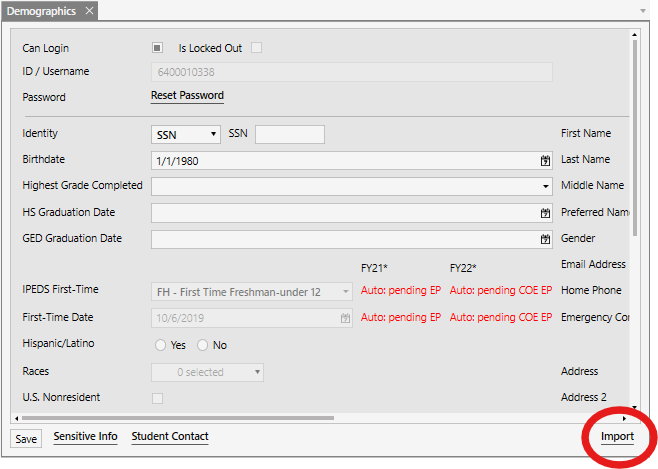
- The Import Demographics form is then displayed, with the title "[ I ] - Demographics".
- Complete the import
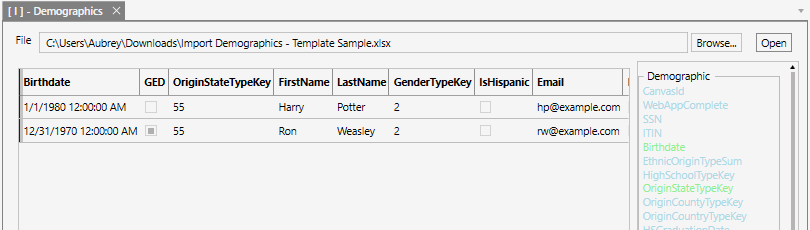
- Click the "Browse..." button to select your file.
- Click "Open".
- Northstar will validate the file and value formats. If any column or value fails validation, an error message with additional details will be displayed. The Excel file will need to be updated to address the errors. After making corrections, click 'Open' again to re-validate. The validation is successful when the grid in Northstar is populated with data.
- All of the column names that were successfully matched will turn green in the right-hand side group-boxes.
- Review the data before continuing.
- If your file contained text for any of the 'Key' fields, such as "Alta High School" for the 'HighSchoolTypeKey' column, those values will be converted to their corresponding numerical PK value, eg. 151.
- Click "Import All". This step initiates the actual saving of the new student accounts. While processing, please be patient and do not close the form or exit the application.
- Note: Importing students uses the exact same process as the individual Demographics form. If Google and/or Canvas integrations are enabled, then new students will also be provisioned with linked accounts in those systems.
- When complete, a green confirmation message is shown.

- Review new accounts
- In the Student Lookup panel, search for any of the newly created students.
- Open the student account and click on the student's name to view the Demographics form.
- Review the data that was imported.